
Key Takeaways
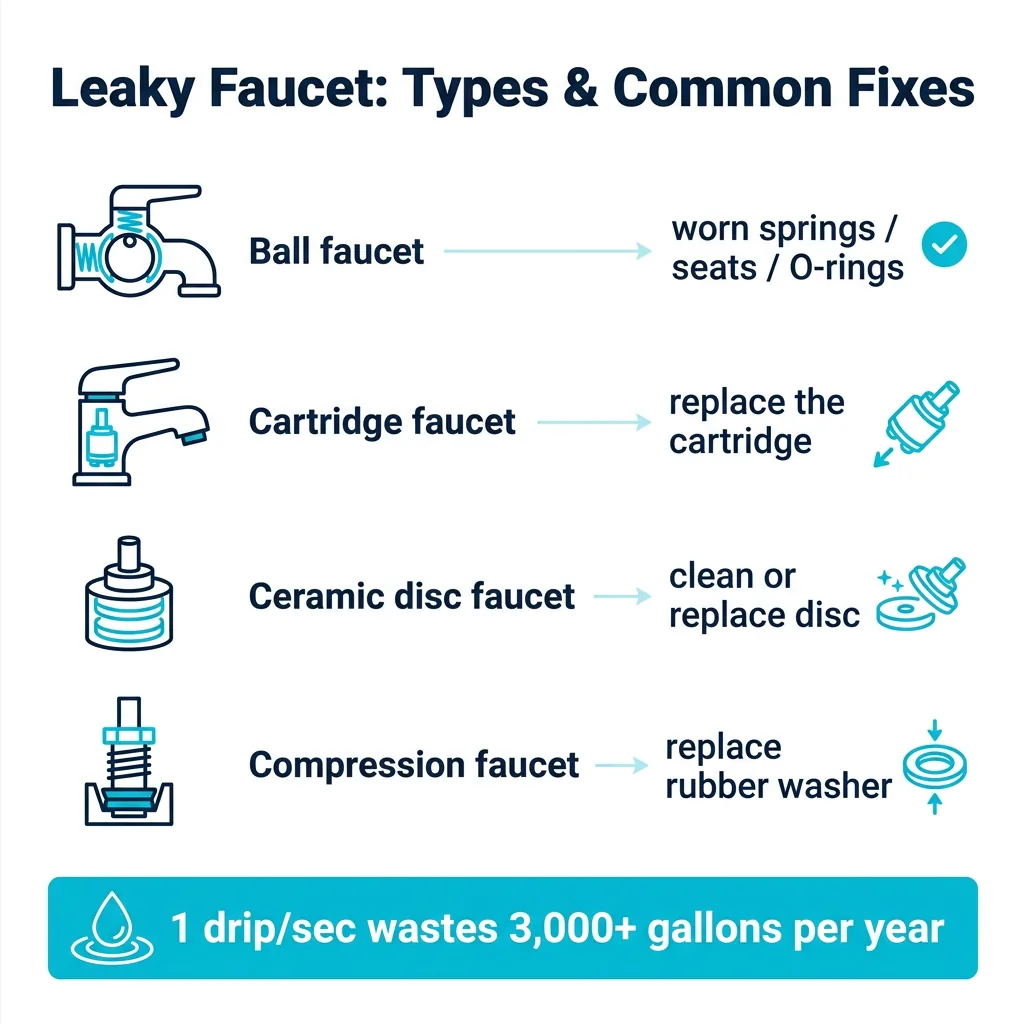
- A faucet dripping at one drip per second wastes more than 3,000 gallons of water per year, according to the EPA.
- Most leaky faucets fail at one of four points: the O-ring, the cartridge, the ceramic disc, or the rubber washer (depending on faucet type).
- Fixing a dripping faucet typically takes 30 to 90 minutes with common household tools. No special skills required for most repairs.
- Turning off the water supply before disassembly is the one step that prevents a minor fix from becoming a flooded bathroom.
- When the faucet body itself is cracked, corroded, or more than 15 to 20 years old, replacement is almost always the better call.
A leaky faucet is almost always a worn-out washer, O-ring, or cartridge. You can fix most dripping faucets yourself in under an hour. Here’s exactly how.
Why a Dripping Faucet Is Worth Fixing Today
Most homeowners put off a dripping faucet. It doesn’t feel urgent. It’s annoying, but it’s not flooding anything.
Here’s the problem: a faucet dripping at just one drip per second wastes more than 3,000 gallons of water per year, according to the EPA. That shows up on your water bill. Multiply that across two or three dripping faucets in the same house, and you’re paying for water you’re not using, every month.
The fix is usually cheap. Most DIY repairs cost less than $20 in parts from a hardware store. Labor for a professional faucet repair runs $269 to $324 nationally. That’s the window you’re working in: a morning of your own time or a quick call to schedule someone.
Step 1: Know Your Faucet Type
Before you buy parts or touch a wrench, identify which type of faucet you have. The repair is different for each.
Ball faucet. Common on single-handle kitchen faucets. Has a ball-shaped cap below the handle. Leaks usually come from worn springs, seats, or O-rings inside the ball assembly. Sold as a complete repair kit.
Cartridge faucet. Common in bathrooms. The handle controls a plastic or brass cartridge that moves up and down. When the cartridge wears out, the faucet drips. Replace the cartridge as a unit.
Ceramic disc faucet. Has a wide, single lever over a cylindrical body. Uses two ceramic discs that slide against each other. Very durable. When they fail, clean or replace the disc cylinder.
Compression faucet. The oldest style. Two separate handles, one hot, one cold. You compress a rubber washer against a seat to stop the flow. The washer wears out and needs replacing. Common in older West Long Branch and Monmouth County homes built before the 1980s.
Knowing your type tells you exactly what to buy before you open the faucet up.
Step 2: Gather Your Tools and Parts
You don’t need a plumber’s truck. Most faucet repairs need:
- Adjustable wrench or channel-lock pliers
- Phillips and flathead screwdrivers
- Hex/Allen key set (for set screws under decorative caps)
- Replacement parts: cartridge, O-rings, washers, or a ball repair kit (specific to your faucet model)
- Plumber’s grease (silicone-based)
- Teflon tape
- Towel and small bucket
Take the old cartridge or washer to the hardware store with you. Matching it in person saves a trip.
Step 3: Shut Off the Water Supply
This is the step people skip. Don’t.
Look under the sink for the shutoff valves, one hot, one cold. Turn them clockwise until they stop. Then turn on the faucet to drain the remaining water in the line. This step takes 30 seconds and prevents a wet ceiling if something goes sideways.
If the shutoff valves under the sink are corroded and won’t close, shut off the main house supply instead. In older homes near the shore, this is common. Salt air speeds up valve corrosion. While you have things open, note whether the valve itself needs replacing. It’s a five-minute job while you’re already in there.
Step 4: Disassemble the Handle
Most faucet handles have a decorative cap covering the screw that holds the handle on. Pop it off with a flathead screwdriver. Remove the screw underneath. Pull the handle straight up.
Work slowly and set each part on the towel in the order you remove it. This makes reassembly straightforward.
Once the handle is off, you’ll see the cartridge, packing nut, or ball mechanism depending on your faucet type. Photograph it with your phone before removing anything. You’ll thank yourself later.
If anything looks cracked, discolored, or unusually worn, replace it. O-rings go bad, valve seats pit over time, and rubber washers flatten and harden.
Step 5: Replace the Worn Part
Cartridge faucet. Grip the cartridge with pliers and pull straight up. Note which side faces forward (the flat or notched edge often keys to one direction). Press the new cartridge in the same orientation. Wrong orientation and the hot and cold sides swap.
Ball faucet. Use the repair kit. Replace the springs, seats, and O-rings in the order the kit instructions show. The ball itself rarely needs replacing unless visibly damaged.
Compression faucet. Unscrew the stem and look at the rubber washer at the bottom. If it’s flattened, cracked, or has a groove worn into it, that’s your leak. Remove the old washer (usually held by a brass screw), press in the new one, and reassemble. Apply plumber’s grease to the O-ring on the stem.
Ceramic disc. Remove the cylinder, clean the discs with white vinegar if they look cloudy or dirty, and replace any cracked discs. If the discs look fine but the faucet still drips after cleaning, replace the cylinder as a unit.
Step 6: Reassemble and Test
Reassemble in reverse order. Hand-tighten first, then snug with a wrench, but don’t over-torque. Forcing a plastic cartridge housing cracks it.
Turn the shutoff valve back on slowly. Let water fill the line before turning the faucet handle. Check under the sink for any drips at the supply connection. Turn the faucet on and off several times and watch the spout.
A faucet that dripped before should be bone dry now. If it’s still dripping, the valve seat may be pitted and need refinishing or replacement. At that point, a new faucet often makes more sense economically.
The City of Portland Water Bureau’s faucet leak repair guide confirms that most faucet repairs follow this same sequence, and that fixing leaks promptly saves both water and money. For more on what routine plumbing maintenance looks like before small problems turn into big ones, see our guide on home repair issues in coastal West Long Branch homes.
When to Call Instead of DIY
Not every faucet repair belongs on a Sunday afternoon project list. Call a licensed plumber when:
- The shutoff valves under the sink won’t close (corroded valves need replacement before anything else)
- The faucet body itself has a crack or the spout wobbles at the base
- Water is coming from behind the wall, not just the faucet
- You’ve replaced the cartridge and it still drips (valve seat damage)
- The faucet is more than 15 to 20 years old and repairs cost more than a new unit
We handle plumbing repairs and fixture replacements throughout West Long Branch and Monmouth County. If a repair turns into something bigger, we tell you upfront before adding scope.
Repairs that get deferred often become water damage situations. Our post on what small winter repairs prevent big damage later covers the same logic applied to seasonal maintenance.
If you’d rather hand this off entirely, call us at (848) 272-9900 for a free estimate. We’re licensed, insured, and available around the clock for West Long Branch and all of Monmouth County.
Frequently Asked Questions
1. Can you fix a leaky faucet yourself?
Yes, for most dripping faucets. If you can turn off a shutoff valve, use a screwdriver, and match a replacement cartridge or washer at the hardware store, you can fix most faucets in under an hour. The repair gets harder when the shutoff valves are corroded, the faucet body is cracked, or the valve seat is damaged, all of which are more common in older homes.
2. What is the most common cause of a leaky faucet?
Worn-out internal seals are the most common cause we see. In cartridge faucets, it’s usually the cartridge itself. In compression faucets (common in older homes), it’s the rubber washer at the bottom of the stem. Both are inexpensive parts available at any hardware store, and swap out without special tools.
3. Why is my faucet dripping after I replaced it?
A cartridge installed in the wrong orientation, an O-ring that wasn’t seated fully, or a pitted valve seat can all cause dripping after a repair. Pull the cartridge and check orientation first. If the cartridge is correct and the faucet still drips, the valve seat (the surface the washer or cartridge seals against) may be damaged and need refinishing or replacement.
4. How much does a plumber charge to fix a leaky faucet?
Professional faucet repair runs $269 to $324 nationally, according to Homewyse’s 2026 estimates. In Monmouth County, NJ, expect rates at or above that range given local labor costs. For a simple cartridge swap, most jobs are completed in under an hour. If the shutoff valves also need replacing, add parts and time.